Friday, 3 April 2015

End of March, start of April

And the moment when I realise I didn't actually blog for the whole of March. Oops. I'm sure I've been doing something productive in the sewing room, though my attentions have sometimes been elsewhere.  I haven't been buying fabric, as I'm back on the fabric fast wagon for now. But I've been on the Whole 30 again so probably spending more time in the kitchen. And I've even been exercising for the first time in about 6 years! But my littlest is now at that age (two) where she doesn't actually let me achieve anything at all, so sewing time has felt pretty minimal lately.

However. I have been on a Siblings Together mission. For anyone who has somehow missed my lengthy ramblings on this topic, here's a reminder about why the charity is so important and what quilts have to do with it!

Siblings Together is a UK based charity which aims to build and nurture relationships between siblings separated by the UK care system. There are over 40,000 children in care in the UK who are living apart from a brother or sister. They could be in foster care, in adoptive families, or with their birth family. Among other activities, the charity hosts yearly residential summer camps for children aged 7-18 years. As part of these camps, the children are each given a quilt. A precious handmade item, infused with love and memories of time spent with their sibling. 

There is a huge need for these quilts. The charity are expecting to welcome up to 100 children to summer camps this year, so 100 quilts are needed and what we are aiming for! 

There are lots of ways to get involved - check out the Flickr group. And there's a running total thread in that group too so if you have finished a quilt for ST and want it to be added to the total please pop on and log it! We are now up to 31 finished quilts, so still a long way to go!


So, I've been making STQB bee blocks:


Making blocks to send to others who are collecting for ST quilts. To Mary:

Five #siblingstogetherhsh blocks for @maryemmens  Hobby horse not included 😁 #siblingstogether

And to Jo:

Sorbet churn dash blocks for @rosedahlia #siblingstogether


And working with LeedsMQG to put together at least ten quilts for the charity. We collected girly home sweet home blocks from all over the quilting community:


And pooled our own donations of fabric and scraps.

The tip of the scrap iceberg!

I have one finish, my own STQB quilt from December.


It's a finish! #siblingstogether #stqb #finishit2015 #quilt #quilting #sewing #handmade


And two waiting more to piece/baste/quilt/bind.


In other sewing news I've been participating in the LeedsMQG round robin.


Made a teeny bit of progress on my Aviatrix medallion.


And even recovered my filthy ironing board!


And yet haven't achieved everything on my Q1 FAL list! Off to do a round up of that now.

And I should really lay out my April goals too, which mostly consist of "finish all the quilts".

In the meantime, I'll link up with Lynne:


Fresh Sewing Day


A quick finish for Siblings Together

December was my month in the STQB and I asked for simple 16.5" four patch snowball blocks in a green, blue and aqua colour palette. I decided to make an extra row and column to boost the size of the finished quilt a little and ended up with this:


It's a finish! #siblingstogether #stqb #finishit2015 #quilt #quilting #sewing #handmade


I love the way that a load of fabrics from a load of different people can work so well together.

It's quilted very simply with straight lines a 1/4" from each seam line, in my favourite white aurifil #2021. Backed in some Ikea Nummer and bound in a blue print from my stash.

It just needs a label then it can be sent off to Siblings Together.


That's 31 finished quilts now for the charity this year. We are still a long way off our target of 100 so if you want to get involved in anyway please shout. Oh and it's a tick off the Q1 FAL list too. 

Tuesday, 24 February 2015

Oakshott Blog Hop


Good morning and welcome to the Oakshott blog hop! I feel very proud to be one of eight lucky quilters and bloggers chosen to show you some fun and fabulous ways to use this beautiful new Oakshott colourshott stack.


The blog hop is being hosted by Lynne over at Lily's Quilts and you can find the full schedule, and links through to the other projects, right here.

I was sent this stack of 27 10" squares of Colourshott shot cottons, along with 1.5m of the shimmery white Colourshott 57 "Camargue" as background fabric. I wanted to put together a really straightforward but good sized quilt that maximised every inch of these pretty fabrics. So here is my tutorial for a simple hourglass block lap quilt. I hope you will all have a go at making one - the same block pattern can be used for any layer cake squares, but it really is particularly effective with these multi-toned Oakshott cottons. 

Hourglass quilt tutorial

Finished quilt size 51" by 68"

Fabric requirements

An Oakshott Colourshott stack* or 24 coloured fabric 10" squares
1 3/4 yards of 54" wide white background fabric (I used Colourshott 57 Camargue)
4 yards backing fabric
1/2 yard binding fabric (I used Colourshott 38 Fleur)

*You only need 24 10" coloured squares for this quilt so you can start by setting aside three of your Colourshott stack squares. I just took out the white ones -  Camargue and White Marble -  as they were too close to my background colour. I then made blocks with the remaining 25 squares and then selected my favourite layout. I will give instructions to do the same.

Make your blocks!

Cut your 54" wide background fabric into five 10" strips. Subcut each strip into five 10" squares for a total of 25 background 10" squares.

On the wrong side of each white background square draw a diagonal pencil line.


Pin each white square right sides together (RST) with a coloured square, being sure to keep your pins well away from the drawn line.


Sew 1/4" down each side of the drawn line. Chain piece this step!


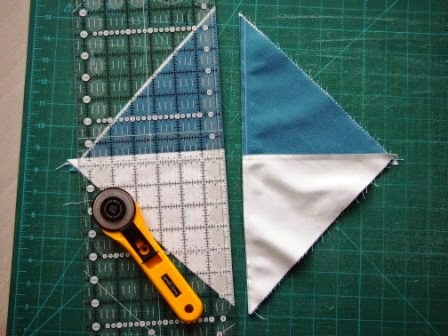
Snip all your chain piecing threads then cut each block along the drawn pencil line. This will give you two half square triangles (HSTs) in each colour. Be sure to keep them in colour pairs, don't jumble them up! Press each HST to the coloured side. Don't be tempted to press these seams open - we will be locking our seams together later to get perfect hourglass points!


Take one of your HSTs and draw a diagonal pencil line on the wrong side as show. This line will bisect your existing seam.


Once you've drawn the line, pair the HST with its colour matching partner, RST, coloured half to white half as shown. Your seams are pressed in opposite directions and will lock perfectly together, be sure to nestle them up against each other so they are locked but not overlapping. Pin, again well away from the drawn line. 


Repeat this process for all pairs of HSTs so that you have a pile of hourglass blocks pinned and ready to chain piece!

Sew 1/4" down each side of the drawn line as before. 

Cut along the drawn line.


Press seams to the side or open as you prefer. Open seams here reduce the bulk but I never have the patience for it!


Trim all your hourglass blocks to 9" unfinished using a large square ruler.


Make your quilt top!

Lay out 24 of your hourglass blocks in a 6 by 8 layout. Rotate alternate blocks through 90 degrees so that the coloured triangles are always next to the white triangles as shown in the photo below. I went for a fairly random layout but you can choose whatever pleases you most. 


Once you have chosen your layout, label your blocks so you can keep track of them. Piece into eight rows of 6 blocks each. Press seams in alternate rows in opposite directions, ie top row to the right, next row to the left and so on. Then pin (or glue baste for perfect points) your rows together, locking seams as before. Press well and admire your finished quilt top!

Finish your quilt!

Remove the selvages from your backing fabric, cut in half and piece together down the selvage edge with a 1/2" seam. This gives you a backing sized approximately 80" by 72" which is plenty big enough.

Baste your quilt using your preferred method and quilt as desired! I used Aurifil 50wt #2021 and quilted simple straight-ish lines 1/4" to each side of each block seam line, both horizontally and vertically. 


Cut your binding fabric into 2.25" strips. My binding fabric was 54" wide so I only needed 5 strips. Sew these together end to end then press the strip in half to make your binding. Bind your quilt! I prefer to attach the binding to the front by machine then hand sew it down to the back for a neat finish. 


And you're all done! A super simple, great sized quilt and - best of all - minimal fabric waste. 

If you make an hourglass quilt using these blocks and these very special cottons I'd love to see it. You can find and tag me on Instagram @hannlib.


Don't forget to pop back to Lily's Quilts to check out the rest of the blog hop schedule - there have been some wonderful projects already!


Monday, 23 February 2015

Sew Together Bag finish!

Back in January I embarked on a rather challenging task - to make two Sew Together bags. I had decided to make one for my Bitches Get Stitches swap partner out of this beautiful stack of Priory Square:


And I knew that once I'd finished I would want one for myself. But that I would not want to make another one. So I decided to make them simultaneously. And I did.


The general wisdom with these bags is to use the pattern lightly and rely heavily on the far more detailed instructions in The Quilt Barn's Sewalong. This is good advice and makes the whole process much easier to follow.

I didn't quilt my outer panels, partly because I just wanted to use Katy's beautiful Sunday Clippings print, partly because I didn't want to add extra bulk that I knew my machine would struggle with and partly because I simply couldn't be bothered. There are some truly exceptional pieced versions out there but I was happy to give it a miss on this occasion. Obligation sewing does not bring out the best in me. So I interfaced my outer panels with Craft Fuse which worked perfectly. Just the right amount of stiffness and body, it's lovely and smooth and I could keep it out of my seam allowances. I interfaced the inner pockets with woven interfacing as directed.


Other things of note: 
I sewed down much of the binding by hand. There was just no way my machine was sewing through all those layers. It didn't take too long, was no more fiddly than wrangling it under the machine and is WAY neater than I could have achieved otherwise.

I abandoned the zipper tab instructions and used my favorite tutorial instead. Much neater. 

I sewed the zipper tabs down by hand too. Didn't even try to machine them.

I used an 18" long zipper as recommended but have since seen suggestions to use 20". I can see this would be a good thing.

I have also seen the suggestion to match binding to zipper to thread. I can also see that this would be smart from a neatness point of view.

Overall, I'm thrilled. I'm certainly in no rush to make another but I'm very glad I have one of my own.

My swap partner was thrilled too. The BGS swap was a fun little sweary swap I joined on Instagram for makers with a penchant for profanities. All sorts of tremendously hilarious items were made but, like me, my partner has small children at home. Small children who can read. So I went subtle and the naughty words were hidden in the pockets of the bag, for her to peek at and be amused by but out of the sight of questioning young eyes.  

If you are easily offended, don't peer too closely at these pictures!


And I got a really wonderful package in return:

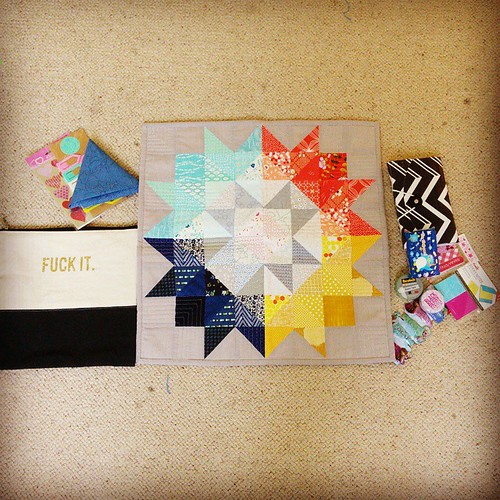
@kammart wow thank you so so much!! My #bitchesgetstitchesswap parcel just arrived and it is fucking perfect, you got me spot on. So many fab extras too, love love love!! #foulmouthedmakers @jrshules mine is here you can tick me off your list!


Again, just the right amount of sweary.

This is the last swap I have committed to for now as they just aren't great for my sewjo. But it was a good one for sure. And that's a Q1 FAL finish finished!!

Tuesday, 13 January 2015

Finish Along 2015 Q1

It's a new year and that means the FAL has a new home.


2015's brave volunteer to manage this enormous beast is Adrianne of On the Windy Side. Adrianne lives in my most favourite place on earth, a long way from Yorkshire in beautiful New Zealand.

I've decided to fabric fast again for at least the first 6 months of 2015. I went a bit wild over Christmas replenishing my stash and so now it is time to sew. Let's see what's top of the list.

1. Bitches get stitches swap.
This is a fun little sweary swap I've joined on Instagram. My partner is apparently an exceptionally talented sewer with impeccable taste in fabric, so of course I thought it'd be sensible to make an item from a notoriously tricky pattern with some of my favourite ever fabric.


Even more cleverly I'm making two, production line style, because once I'm done I know I'll want one for myself. I don't want to spoil any surprises so you'll have to wait and see more once it is received.

2. Secret sewing


Deadline of February, so once number 1 is done this is next up.

3. Random churn dash block cushion

giant churn dash

Need to turn this block into a lovely cushion cover.

4 STQB quilt

December was my month and I asked for simple snow ball blocks in a limited palette of aquas, blues and greens.


December blocks so far for #stqb #siblingstogether


I have all my blocks back and just need to make my own and then some extras to boost the size a little. Then make this into a quilt, obviously.


Onto the rollover UFOs now.

4. Aviatrix medallion
I must finish this before I start any more quilts. I am a fool for abandoning it.


5. Pile o fabric skill builder BOM
Yep. Don't hold your breath for this one folks. To be fair though it's the only big UFO I have....


I find it hard to believe that these are the only WIPs in the house. But they are. Wouldn't it be amazing to get them done??

More likely is that I will add to them. I have piles and piles of planned projects, stashed fabric with a pattern in mind. I generally call these WNQIPs or works not quite in progress. I'll try to get a blog post up about them as these are the things that keep me awake at night, plotting and planning and wondering what do to start next and forgetting what patterns I've bought and what plans I have. Adding these to the FAL always seems a bit of a cheat when they aren't actually started, but you have to be in it to win it so I often do!

Maybe we need a start-along?? Kind of like a year/ quarter of specific sewing plans. After all, no one likes just finishing WIPs, do they??

Let me know your thoughts, if you happen to have any.

In the meantime I'm linking up my Q1 finish goals, while all the time pondering what else to start.

Tuesday, 6 January 2015

FAL Q4 round up

So back in October I laid out my finishing goals for the end of 2014, including the hilarious line "let's see if I can end the year with no WIPS". Well here's a spoiler for you: I didn't. But I did do a reasonable job of cracking through the list.


1) IGminiswap

Done and blogged and sent and received and loved.


2) Pouch commission

All finished on time and blogged with a note to self to not take further commissions.


3) Vaguely festive churn dash quilt

I was really thrilled to get this one finished and onto the sofa at the very start of December. Lack of both daylight and motivation stopped me getting any decent photos of it however and it has therefore only just now been blogged. Still with crap photos.


4) Aviatrix medallion.

Umm, nope. Haven't even looked at it. Next ....

5) Skill builder BOM

This is also not in any way shape or form finished BUT I have FMQd some of the blocks following the workshop with Trudi. So, some small progress.

6) Super Tote

Another, finished, used and loved item that I have procrastinated on writing up. But done!


So that's 4 out of 6 which I think we can call not bad at all.


Linking up with Katy before she hands the FAL baton on to another brave soul for 2015 ...